All times are UTC


It is currently Fri Apr 26, 2024 5:57 am


Post new topic Reply to topic  [ 146 posts ]  Go to page 1, 2, 3, 4, 5 ... 8  Next
Author Message
 Post subject: Gondorian Fort WIP - UPDATED 26/6/14
PostPosted: Wed Oct 23, 2013 11:41 pm 
Kinsman
Kinsman
User avatar
Offline

Joined: Mon Oct 14, 2013 1:07 am
Posts: 79
Location: Scotland, Middle Earth
Hey again folks! Just thought I'd share something else I'm working on.

Its a gondorian style fort based on the one in BGiME #48 with a few slight changes.

I know its not perfect but its my first proper attempt at a piece of scenery (other than a few small random things from early BGiME issues) so there is obviously a lot that could be improved.
I tend to be slightly impatient with things at times and I tend to cut corners whenever I get a chance so some bits may have been rushed a bit. Still quite pleased with the progress so far though!

I'm was planning to tile the entire wall surface with thin card but that seems like a rather tedious task so I'm considering other ways of doing it to save time. Any suggestions anyone?
In the next few days I'm planning to possibly add a small tower to it and possibly attempt some sort of fountain for the courtyard.

Hope yous like it and as always comments and criticism are welcome/encouraged! I appreciate all suggestions from those of you that have more experience with this than me and hopefully you can help me improve it!

Thanks 8)


You do not have the required permissions to view the files attached to this post.

_________________
Link to my gondorian fort WIP - viewtopic.php?p=372063#p372063


Last edited by malky23 on Thu Jun 26, 2014 12:20 pm, edited 1 time in total.
Top
  Profile  
Reply with quote  
 Post subject: Re: Gondorian Fort WIP
PostPosted: Thu Oct 24, 2013 12:27 am 
Elven Elder
Elven Elder
Offline

Joined: Thu Dec 20, 2012 12:18 pm
Posts: 2528
Location: Dallas, Texas
I don't have much experience to offer advice with but I think it looks great.

_________________
Commission Painting @FB http://www.facebook.com/squyrepainting
Commission Customers include:
GBHL Youtube Channel
MiniWargaming
Top
  Profile  
Reply with quote  
 Post subject: Re: Gondorian Fort WIP
PostPosted: Thu Oct 24, 2013 1:02 am 
Kinsman
Kinsman
Offline

Joined: Thu Jun 20, 2013 12:06 am
Posts: 100
Woah , that is REALLY good , outpost in southern illthilien surrounded by trees is it?
Top
  Profile  
Reply with quote  
 Post subject: Re: Gondorian Fort WIP
PostPosted: Thu Oct 24, 2013 1:56 am 
Loremaster
Loremaster
User avatar
Offline

Joined: Fri Feb 24, 2012 11:28 am
Posts: 1389
Its an awesome keep to build and the 1st you ever build on those magazines.
Its looks a quite outstanding centerpiece of an outpost.... gondor border or even old arnor (arnor theme would look absolutely awesome)...
Small clearance around that keep, full of pines trees all around and if you like a snow theme map.... a keep in the middle of a forest :P

Or the local keep watching over rhudaur lands to be part of scenario for campaign... :)
Top
  Profile  
Reply with quote  
 Post subject: Re: Gondorian Fort WIP
PostPosted: Thu Oct 24, 2013 3:47 am 
Craftsman
Craftsman
User avatar
Offline

Joined: Tue Jan 08, 2013 11:26 pm
Posts: 435
Images: 3
wow great job. I've had a couple of failed attempts at this myself. I really like your design changes. I'd be very happy to have that on my gaming table.

_________________
I think a drug habbit would be cheaper...
Top
  Profile  
Reply with quote  
 Post subject: Re: Gondorian Fort WIP
PostPosted: Thu Oct 24, 2013 6:34 am 
Kinsman
Kinsman
Offline

Joined: Tue Jul 12, 2011 5:11 pm
Posts: 216
Wow, that is looking awesum. really well done esp for a first time
now im tempted to make a keep myself lol..very inspirational and very well done
Top
  Profile  
Reply with quote  
 Post subject: Re: Gondorian Fort WIP
PostPosted: Thu Oct 24, 2013 11:13 am 
Loremaster
Loremaster
Offline

Joined: Thu Feb 09, 2012 11:01 am
Posts: 1829
Location: Lancashire
Looking good from what I can see, I like the fact you've mimicked the crenulations from the existing scenery.

_________________
My Miniatures Blog (covering LOTR/Terminator/Doctor Who/Warpath and more!):
http://cruciumgiger.blogspot.co.uk/
Top
  Profile  
Reply with quote  
 Post subject: Re: Gondorian Fort WIP
PostPosted: Thu Oct 24, 2013 11:39 am 
Loremaster
Loremaster
User avatar
Offline

Joined: Sun Jun 10, 2012 8:52 pm
Posts: 1815
Images: 10
Well, it looks pretty perfect to me...
Fantastic stuff! I can't think of any criticism to be honest.... all it need is a good paint job really :yay: :yay:

_________________
'Though my memory's fading, I remember two things very clearly: I am a great sinner and Christ is a great Savior'
-John Newton
Top
  Profile  
Reply with quote  
 Post subject: Re: Gondorian Fort WIP
PostPosted: Thu Oct 24, 2013 12:06 pm 
Elven Elder
Elven Elder
User avatar
Offline

Joined: Thu Aug 13, 2009 6:37 am
Posts: 3499
Location: Hull UK
Images: 14
Malky
First things first we need to sort a couple of things.
1. This fort looks wonderful and has been put together with thought and patience.
2. There is no easy way to say this but if you want this to look the part then cutting corners will have to stop. Concentrate on a small part each time you work on it and slowly watch it come together. My bag End is my example and I'm now concentrating on fine details which are slowly changing its appearance. I've still loads to do as I have a mental vision I'm workng too. You need that vision whether in your head or on paper as it's obvious you have the talent to make this special.
Now look at the below photo.
Image
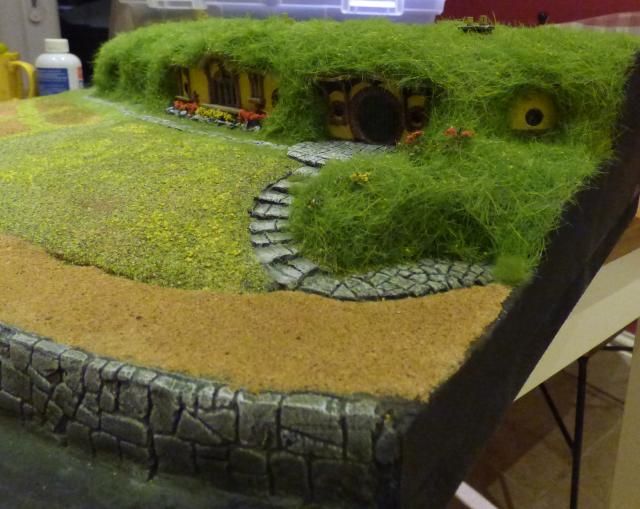
Concentrate on the wall. This is so easy to do.
I covered the foam with polyfilla. It was only a few millimetres thick and I spread it out fairly smooth, but I'm not a plasterer so it wasn't like a snooker table !!!
When it had dried I even filed a couple of large bits down, so that's how imprecise you can be.
Now the fun starts. I got a sharp tool ( actually the point of a modelling file ) and then scratched out the brickwork. The whole wall is about 35cm long and took no more than 20 mins to scratch out the brickwork pattern.
As with polyfilla, some lumps fell out but that's great, it creates a realistic damage affect.
Once done I covered it all in black. Now for painting.
These are the old colour range but are easy to find comparisons. The idea is going through dark to light browns and greys to create a layered effect.
Again this is easy and very quick. Maybe another 15 mins to paint the wall.
You simply drybrush the colours on. Make sure you have very little paint on your brush, better to go over an area a few times than too much in one go. The brush has to be literally dry with hardly any paint showing. Test on some paper or kitchen roll be applying to the model.
Use progressively lighter applications as below, in this order
Shadow grey - snakebite leather - codex grey - graveyard earth - fortress grey - bleached bone - skull white.
Now apply a liberal coat of Catchan green that's watered down to four parts water one part paint.
When dry apply final drybrushes of fortress grey then skull white.
Voila - done in lees than an hour from the start of scribing out the bricks to the finished wall and I wouldn't call that cutting corners. You can see how I've only used the lightest colours at the very top edge of the wall and all those colours make it look like it's been there forever.
I find this one of those jobs that as you paint each layer, you see it coming to life, and as it's drybrushing, this happens very quickly.
Think of it this way, the wall is a massive part for any fort / castle and needs to look the part. Get it right and the rest will only make it look better.

_________________
Commission Service Available

mallysminiatures.blogspot.co.uk
Top
  Profile  
Reply with quote  
 Post subject: Re: Gondorian Fort WIP
PostPosted: Thu Oct 24, 2013 1:21 pm 
Loremaster
Loremaster
Offline

Joined: Mon Mar 30, 2009 9:14 pm
Posts: 1556
Location: England
Images: 17
Wow and wow, the fort looks great and I can't wait to see it painted, and the Hobbit hole is a masterpiece!
Top
  Profile  
Reply with quote  
 Post subject: Re: Gondorian Fort WIP
PostPosted: Thu Oct 24, 2013 1:46 pm 
Kinsman
Kinsman
User avatar
Offline

Joined: Mon Oct 14, 2013 1:07 am
Posts: 79
Location: Scotland, Middle Earth
Thanks for the feedback everyone!
Thanks gandalf, that posts a big help. As you can see in the photo of the gate, I've just added on card bricks to the front. I quite like the look of it and know it will look good when dry brushed as its the same way I did it with previous small things I've tried. I quite like the idea of the polyfilla stones, it looks fantastic on your bag end model. Any idea if polyfilla sticks to foam card? I'm sure it will, it sticks to most things. Also, do u think I should stick with the card bricks or attempt the pollyfilla bricks?

On another note, I can't decode what to do with the rest of the board. I was originally just gonna mount the fort on a small board just as a small display piece but I think I might just make a full board with a bit of surrounding area. I'm thinking maybe surrounding with a bit of a wooded area as galanur mentioned and possibly add a small river or something to the right of it. What do you a think? Any other ideas? My imagination isn't really working well today :-D


You do not have the required permissions to view the files attached to this post.

_________________
Link to my gondorian fort WIP - viewtopic.php?p=372063#p372063
Top
  Profile  
Reply with quote  
 Post subject: Re: Gondorian Fort WIP
PostPosted: Thu Oct 24, 2013 2:27 pm 
Elven Elder
Elven Elder
User avatar
Offline

Joined: Thu Aug 13, 2009 6:37 am
Posts: 3499
Location: Hull UK
Images: 14
The card tiles look great and if you are after a clean stonework look then stick with them.
Polyfilla will stick to foam board but I would just scribe the surface of th card first to aid the adhesion.
As for the rest of the board I believe this is a display piece ? If so then look at first to some height variation. A piece of polystyrene underneath everything would lift the fort and by sculpting out the rest, you could create a slope leading down from the fort.
From there you can create a channel for a stream / river and have a nice spot for some trees. A few rocks dotted about and painted as I suggested would create some variation to the stone work.
A scattering of bushes here are there and some flocking and this could really take shape.

_________________
Commission Service Available

mallysminiatures.blogspot.co.uk
Top
  Profile  
Reply with quote  
 Post subject: Re: Gondorian Fort WIP
PostPosted: Thu Oct 24, 2013 3:10 pm 
Kinsman
Kinsman
User avatar
Offline

Joined: Mon Oct 14, 2013 1:07 am
Posts: 79
Location: Scotland, Middle Earth
Yeah that's a good idea gandalf! Might consider that! Do u have anywhere that u recommend for getting polystyrene from? And Styrofoam? I have never managed to find anywhere that sells Styrofoam really. Which type of foam do u recommend for such an application and also how do u suggest I go about carving the hill shape out of it? Its not something I've ever attempted.

Another quick question about the pollyfilla. I'm gonna attempt it on a small test piece to see how I like the result. How long did u leave it before carving the rock shapes? Did u do it instantly after smoothing it or was it left to dry then carved out?
Thanks

_________________
Link to my gondorian fort WIP - viewtopic.php?p=372063#p372063
Top
  Profile  
Reply with quote  
 Post subject: Re: Gondorian Fort WIP
PostPosted: Thu Oct 24, 2013 3:29 pm 
Elven Elder
Elven Elder
User avatar
Offline

Joined: Thu Aug 13, 2009 6:37 am
Posts: 3499
Location: Hull UK
Images: 14
B&Q or any DIY place for polystyrene sheets, probably a 25mm think one. That's what I used for Bag End. You can get a big sheet for about a fiver.
Re the styrofoam, Look for the insulation foam. They have something called Kingspan which is what I got. It has a foil outer lining that peels off.
Both items cut easily with a craft knife but you can be more intricate with styrofoam, you can even file it. Look at my bag End in the early stages. I cut out the polystyrene in a very rough slope then coated with polyfilla to smooth out the lumps and crevices as my cutting was rubbish.
Once dry, give the area a wash with an earthy colour and your ready for starting to flock the area.
I can give you the methods I used for Bag End which to be honest are really easily to apply but look very effective.
It may cost a few quid to get started but you end up with tons of spare stuff for later projects. I reckon I've spent in total about £150 so far but I now have three large boxes of spare stuff for future scenery projects, plu a few large sheets of styrene.

_________________
Commission Service Available

mallysminiatures.blogspot.co.uk
Top
  Profile  
Reply with quote  
 Post subject: Re: Gondorian Fort WIP
PostPosted: Thu Oct 24, 2013 3:41 pm 
Craftsman
Craftsman
User avatar
Offline

Joined: Thu Aug 29, 2013 11:59 am
Posts: 425
Location: In your face!
Nice work!
Top
  Profile  
Reply with quote  
 Post subject: Re: Gondorian Fort WIP
PostPosted: Thu Oct 24, 2013 4:38 pm 
Craftsman
Craftsman
User avatar
Offline

Joined: Thu Jul 12, 2012 7:13 pm
Posts: 274
Location: Netherlands
Don't have any critics so here's just some comment;

Looking great and keep up the good work!!!

I would keep a sort of open space as the gondorians would most likely cut all the trees to close to the walls.. The besiegers though should have a sort of cover thoug ;) rocky hills and a bush here and there would do the trick!

_________________
"His people were of great strength and stature, bold and steadfast, mighty among the Children of Ilúvatar."
Top
  Profile  
Reply with quote  
 Post subject: Re: Gondorian Fort WIP
PostPosted: Thu Oct 24, 2013 4:43 pm 
Elven Elder
Elven Elder
User avatar
Offline

Joined: Thu Apr 01, 2010 11:33 pm
Posts: 3688
Location: Atlanta GA. U.S.A.
Images: 14
Quote:
Gandlaf the Grey
There is no easy way to say this but if you want this to look the part then cutting corners will have to stop.

I do not think it is possible to give better advice than this.

_________________
"the same as a duck you must be made of wood"
Top
  Profile  
Reply with quote  
 Post subject: Re: Gondorian Fort WIP
PostPosted: Thu Oct 24, 2013 4:58 pm 
Kinsman
Kinsman
User avatar
Offline

Joined: Mon Oct 14, 2013 1:07 am
Posts: 79
Location: Scotland, Middle Earth
Thanks gandalf, I'll have a look in b&q when I get a chance. I've only ever seen ceiling tiles in there but I guess I didn't really know what I was looking for properly. Also, just had another look through the bag end thread, what did you use for the flock? I've never seen any like that before, it looks awesome! It kinda sucks that there isn't really any model shops nearby me for quite a distance! I have to rely on the internet which is annoying sometimes as with these kind of things I like to see properly what I'm buying.
Done a bit of testing with polyfilla and decided I'm gonna go with that for all the walls and stonework as I want it to look quite neat but not like perfectly neat. I think the carved stones (but in proper brickwork style) will look a lot more realistic than the card

_________________
Link to my gondorian fort WIP - viewtopic.php?p=372063#p372063
Top
  Profile  
Reply with quote  
 Post subject: Re: Gondorian Fort WIP
PostPosted: Thu Oct 24, 2013 6:20 pm 
Elven Elder
Elven Elder
User avatar
Offline

Joined: Thu Aug 13, 2009 6:37 am
Posts: 3499
Location: Hull UK
Images: 14
As for the flocking, which area had you in mind ?
If it is the grass on the photo above then what you seeks four different colours all loosely scatterd to give that effect. Static grass went on top of this.
I also use the internet a lot to buy the majority of my stuff. If you have a model railway shop anywhere near then they can be a good source of flock and scatter materials.
Woodland Scenics will be my biggest brand I've used. The learning kits are great and provide some instruction on how to apply the different scatters and in what order.
The landscaping kit could be a good one for you and would provide maybe enough material to do your board. If not then it would give you a good start.
I've also used various flowering foliage and grass clumps to create more definition.
Noch are another brand who provide wonderful grasses and grass / weed tufts.
Antenociti workshop is great for internet buying as well as Ebay.
And one thing you can easily do is paint different materials. The main road at the front of my Bag End is sand that I've painted.

_________________
Commission Service Available

mallysminiatures.blogspot.co.uk
Top
  Profile  
Reply with quote  
 Post subject: Re: Gondorian Fort WIP
PostPosted: Thu Oct 24, 2013 9:26 pm 
Kinsman
Kinsman
User avatar
Offline

Joined: Wed Apr 07, 2010 8:14 pm
Posts: 95
Location: Kent
Fantastic fort. looking forward to seeing more.

_________________
[url]http://wargamesdiary.wordpress.com[/url]
Top
  Profile  
Reply with quote  
Display posts from previous:  Sort by  
Post new topic Reply to topic  [ 146 posts ]  Go to page 1, 2, 3, 4, 5 ... 8  Next

All times are UTC


Who is online

Users browsing this forum: No registered users and 47 guests


You cannot post new topics in this forum
You cannot reply to topics in this forum
You cannot edit your posts in this forum
You cannot delete your posts in this forum
You cannot post attachments in this forum

Search for:
Jump to: